
最新のCKAD問題集で試験を準備する

最も有効なCKAD試験問題集を勉強し、試験の準備を気楽にします。
最近更新時間:2026-11-17
問題と解答:全 239 問
ダウンロード制限:無制限
最も有効なCKADテストエンジン、100%試験の合格を保証します。
最新Linux Foundation CKADテストエンジンを利用し、本当のテストにうまく合格できます。CKAD試験勉強資料のすべて内容は専門家によって編集し作成されて、約100%的中率を持ちます。実際試験の環境を慣れ、難問を自信満々に解決し、Linux Foundation CKAD試験に簡単に合格します。
100%返金保証
JPTestKingは、顧客の間で初めて合格率99.6%を達成しています。  弊社は製品に自信を持っており、面倒な製品を提供していません。
- 高品質試験問題集参考書
- 三つバージョンは選択可能
- 十年の優位性
- 365日無料アップデット
- いつでもどこで勉強
- 100%安全なショッピング体験
- インスタントダウンロード:弊社システムは、支払い後1分以内に購入した商品をあなたのメールボックスに送付します。(12時間以内に届けない場合に、お問い合わせください。注意:ジャンクメールを確認することを忘れないでください。)
CKAD オンライン版

- 学習を簡単に、便利オンラインツール
- インスタントオンラインアクセス
- すべてのWebブラウザをサポート
- いつでもオンラインで練習
- テスト履歴と性能レビュー
- Windows/Mac/Android/iOSなどをサポート
- オンラインテストエンジンを試用する
CKAD ソフト版

- インストール可能なソフトウェア応用
- 本番の試験環境をシミュレート
- 人にCKAD試験の自信をもたせる
- MSシステムをサポート
- 練習用の2つモード
- いつでもオフラインで練習
- ソフト版キャプチャーをチェックする
CKAD PDF版

- 印刷可能なCKAD PDF版
- Linux Foundation専門家による準備
- インスタントダウンロード
- いつでもどこでも勉強
- 365日無料アップデート
- CKAD無料PDFデモをご利用
- PDF版試用をダウンロードする
Linux Foundation CKAD 試験概要:
| 認定ベンダー: | Linux Foundation |
|---|---|
| 試験名: | Certified Kubernetes Application Developer(CKAD)試験 |
| 試験番号: | CKAD |
| 受験料: | 445米ドル |
| 対応言語: | 日本語, 簡体字中国語, 英語 |
| 関連資格: | Certified Kubernetes Security Specialist(CKS) Certified Kubernetes Administrator(CKA) |
| 試験時間: | 120 分 |
| 出題数: | 15-20 |
| 合格点: | 66% |
| 認定の有効期間: | 2年間 |
| 試験形式: | 実務実践形式, コマンドライン操作に基づく出題, 実機による課題解答 |
| 推奨トレーニング: | Kubernetes for Developers(LFD259) Introduction to Kubernetes |
| 受験申し込み: | 公式登録サイト |
| サンプル問題: | Linux Foundation CKAD サンプル問題 |
| 受験方法: | オンライン形式、遠隔監督による実施 |
| 前提条件: | 公式な前提条件は設けられていません |
| 公式シラバスのURL: | https://training.linuxfoundation.org/certification/certified-kubernetes-application-developer-ckad/ |
Linux Foundation CKAD 認定試験の出題範囲:
| トピック | 出題範囲 |
|---|---|
| トピック 1 |
|
| トピック 2 |
|
| トピック 3 |
|
| トピック 4 |
|
| トピック 5 |
|
参照:https://training.linuxfoundation.org/certification/certified-kubernetes-application-developer-ckad/
Linux Foundation Certified Kubernetes Application Developer 認定 CKAD 試験問題:
You must connect to the correct host . Failure to do so may result in a zero score.
[candidate@base] $ ssh ckad00044
Task:
Update the existing Deployment busybox running in the namespace rapid-goat .
First, change the container name to musl.
Next, change the container image to busybox:musl .
Finally, ensure that the changes to the busybox Deployment, running in the namespace rapid-goat, are rolled out.
正解:
See the Explanation below for complete solution.
Explanation:
0) SSH to the correct host
ssh ckad00044
(Optional sanity)
kubectl config current-context
kubectl get ns | grep rapid-goat
1) Inspect the Deployment and current container name
kubectl -n rapid-goat get deploy busybox
kubectl -n rapid-goat get deploy busybox -o jsonpath='{.spec.template.spec.containers[*].name}{"\n"}' kubectl -n rapid-goat get deploy busybox -o jsonpath='{.spec.template.spec.containers[*].image}{"\n"}' Note the current container name (likely something like busybox). We need to rename it to musl.
2) Edit the Deployment (best for renaming container)
Renaming a container is easiest with edit:
kubectl -n rapid-goat edit deploy busybox
In the editor, find:
spec:
template:
spec:
containers:
- name: <old-name>
image: <old-image>
Change it to:
- name: musl
image: busybox:musl
Save and exit.
3) Ensure the rollout happens and completes
kubectl -n rapid-goat rollout status deploy busybox
4) Verify the new Pod template is correct
Check the Deployment template:
kubectl -n rapid-goat get deploy busybox -o jsonpath='{.spec.template.spec.containers[0].name}{"\n"}{.spec.
template.spec.containers[0].image}{"\n"}'
Check running Pods and the image actually used:
kubectl -n rapid-goat get pods -o wide
POD=$(kubectl -n rapid-goat get pods -l app=busybox -o jsonpath='{.items[0].metadata.name}' 2>/dev/null || true) If you don't have that label selector, just pick a pod name from kubectl get pods and:
kubectl -n rapid-goat describe pod <pod-name> | sed -n '/Containers:/,/Conditions:/p'
You have a Kubernetes cluster with a Deployment that runs a critical web application. The application's codebase is in a Git repository, and you want to automatically deploy a new version of the application whenever a new commit is pushed to the 'master branch ot the repository. You need to ensure that the deployment process iS seamless and doesn't result in downtime for the web application.
解答を表示 ディスカッション 0正解:
See the solution below with Step by Step Explanation.
Explanation:
Solution (Step by Step) :
I). Set up a Git repository:
- Create a Git repository on a platform like GitHub, GitLab, or Bitbucket.
- Store your web application's code in this repository
2. Configure a webhook:
- Go to the settings of your Git repository and configure a webhook.
- The webhook URL should point to your Kubernetes clusters API server.
- Set the webhook event to 'push' and the branch to 'master
3. Create a Deployment
- Create a Deployment YAML file with the following configuration: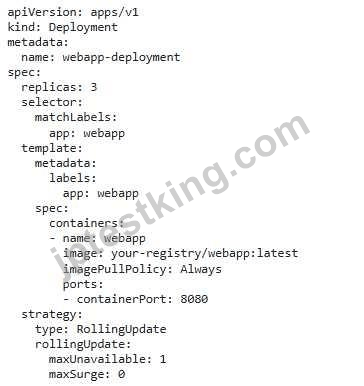
4. Create a Kubernetes Secret: - Store your Git repository's credentials in a Kubemetes secret - This secret will be used to authenticate the webhook request from your Git repository. 5. Create a Job: - Create a Job YAML file with the following configuration:
6. Apply the resources: - Apply the Deployment, Secret, and Job YAML files to your Kubernetes cluster 7. Test the deployment: - Push a new commit to the 'master' branch of your Git repository. - Observe that the Job runs and updates the Deployment with the new image. - VeriSi that the web application is still accessible during the update process.
You have a stateful application that requires persistent storage. You need to create a PersistentV01umeClaim (PVC) that Will be used by a Deployment to store application dat a. The PVC should have the following specifications:
- Access Modes: ReadWriteOnce
- Storage Class: 'fast-storage
- Storage Size: IOGi
Provide the YAML code for creating this PVC.
正解:
See the solution below with Step by Step Explanation.
Explanation:
Solution (Step by Step) :
1. create the PVC YAML file: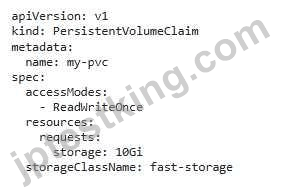
2. Apply the PVC YAML using kubectl: bash kubectl apply -f my-pvc.yaml 3. Verify the PVC creatiom bash kubectl get pvc You should see the PVC ' my-pvc' listed with the specified access mode, storage class, and size.,
Context
You are asked to scale an existing application and expose it within your infrastructure.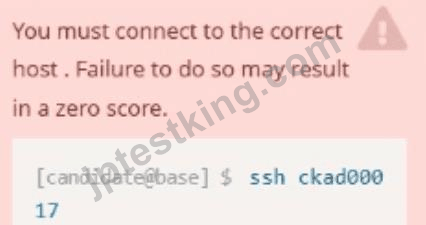
First, update the Deployment nginx-deployment in the prod
namespace :
. to run 2 replicas of the Pod
. add the following label to the Pod :
role: webFrontEnd
Next, create a NodePort Service named rover in the prod namespace exposing the nginx-deployment Deployment 's Pods See the Explanation below for complete solution.
正解:
Below is an exam-style, step-by-step solution (commands + verification). Follow exactly on host ckad000.
0) Connect to the right host
ssh ckad000
(Optional but good sanity check)
kubectl config current-context
kubectl get ns
1) Inspect the existing Deployment (to know its labels/ports)
kubectl -n prod get deploy nginx-deployment
kubectl -n prod get deploy nginx-deployment -o wide
Check what labels the Pod template already has (important for the Service selector):
kubectl -n prod get deploy nginx-deployment -o jsonpath='{.spec.template.metadata.labels}{"\n"}' Check container ports (so we expose the correct targetPort):
kubectl -n prod get deploy nginx-deployment -o jsonpath='{.spec.template.spec.containers[0].ports}{"\n"}' If ports output is empty, it's still often nginx on 80, but the safest is to confirm by describing a pod later.
2) Update Deployment to 2 replicas
Fastest:
kubectl -n prod scale deploy nginx-deployment --replicas=2
Verify:
kubectl -n prod get deploy nginx-deployment
3) Add label role=webFrontEnd to the Pod (Pod template label)
You must add it under:
spec.template.metadata.labels
Use a patch (quick + safe):
kubectl -n prod patch deploy nginx-deployment \
-p '{"spec":{"template":{"metadata":{"labels":{"role":"webFrontEnd"}}}}}' Verify the Deployment template now includes it:
kubectl -n prod get deploy nginx-deployment -o jsonpath='{.spec.template.metadata.labels}{"\n"}' Now verify the running Pods have the label (important!):
kubectl -n prod get pods --show-labels
If the label doesn't show on pods immediately, wait for rollout:
kubectl -n prod rollout status deploy nginx-deployment
kubectl -n prod get pods --show-labels
4) Create a NodePort Service rover exposing the Deployment's Pods
4.1 Get a reliable target port
Try to read containerPort:
kubectl -n prod get deploy nginx-deployment -o jsonpath='{.spec.template.spec.containers[0].ports[0].
containerPort}{"\n"}'
* If this prints a number (commonly 80), use it as --target-port.
* If it prints nothing/empty, check a pod:
POD=$(kubectl -n prod get pod -l role=webFrontEnd -o jsonpath='{.items[0].metadata.name}') kubectl -n prod describe pod "$POD" | sed -n '/Containers:/,/Conditions:/p' | sed -n '/Ports:/,/Environment:/p' Assuming nginx is on 80 (most common), create the service:
kubectl -n prod expose deploy nginx-deployment \
--name=rover \
--type=NodePort \
--port=80 \
--target-port=80
If your nginx container port is different (e.g., 8080), change --target-port=8080 accordingly.
5) Verify Service + endpoints (critical)
kubectl -n prod get svc rover -o wide
kubectl -n prod describe svc rover
kubectl -n prod get endpoints rover -o wide
You should see 2 endpoints (matching 2 pods).
Also confirm the pods are Ready:
kubectl -n prod get pods -l role=webFrontEnd -o wide
Quick "CKAD checkpoints"
* Deployment in prod has replicas=2
* Pod template has label role=webFrontEnd
* Service rover in prod is NodePort
* Service endpoints point to the nginx pods
You need to create a container image for an application that uses a specific version of Node.js (v16.x). How would you define this version within your Dockerfile to ensure the application runs as expected in a Kubernetes cluster?
解答を表示 ディスカッション 0正解:
See the solution below with Step by Step Explanation.
Explanation:
Solution (Step by Step) :
1. Specify Node.js Base Image:
- In your Dockerfile, start by selecting a Node.js base image from Docker Hub that matches the required version (v16.x).
- Example:
dockerfile
FROM node:16.x
2. Copy Application Code:
- Copy your Node.js application code into the Docker image.
- Example:
dockerfile
COPY
3. Install Dependencies:
- Use the 'RIJN' instruction to install any necessary Node.js dependencies using 'npm install'.
- Example:
dockerfile
RUN npm install
4. Define Startup Command:
- Specify the command to start your Node.js application within the Dockerfile_
- Example:
dockeffile
CMD ["npm", "start"]
5. Build and Deploy:
- Build your Docker image using the 'docker build' command.
- Deploy the image to your Kubernetes cluster using a Deployment or Pod.
- Ensure the container utilizes the specified Node.js version (v16.x).
全 48 ページ中 1 ページ目を表示しています。
全 239 問中 1-5 問目を表示しています。

JPTestKingは数年以来、認定試験研究向けの専門チームによって高品質のCKAD試験問題集を開発しました。業界では、ほぼ100%通過率で人々に褒められます。CKAD試験を準備する受験者は弊社の試験問題集を購入したら、短時間に試験の流れと知識を掌ることができます。他の人より少ない時間を費やして自信満々試験に参加するのは弊社のLinux Foundation CKAD問題集が試験の合格を保証することです。
その他、万が一試験に合格しないなら、弊社は全額返金を保証します。それで、何も心配しなくて、問題集の勉強に取り組んでいいだけです。
よくある質問
JPTestKingはどんな学習資料を提供していますか?
テストエンジン:CKAD試験試験エンジンは、あなた自身のデバイスにダウンロードして運行できます。インタラクティブでシミュレートされた環境でテストを行います。
PDF(テストエンジンのコピー):内容はテストエンジンと同じで、印刷をサポートしています。
購入後、どれくらいCKAD学習資料を入手できますか?
あなたは5-10分以内にLinux Foundation CKAD学習資料を付くメールを受信します。そして即時ダウンロードして勉強します。購入後に学習資料を入手しないなら、すぐにメールでお問い合わせください。
更新されたCKAD学習資料を得ることができ、取得方法?
はい、購入後に1年間の無料アップデートを享受できます。更新があれば、私たちのシステムは更新された学習資料をあなたのメールボックスに自動的に送ります。
CKADテストエンジンはどのシステムに適用しますか?
オンラインテストエンジンは、WEBブラウザをベースとしたソフトウェアなので、Windows / Mac / Android / iOSなどをサポートできます。どんな電設備でも使用でき、自己ペースで練習できます。オンラインテストエンジンはオフラインの練習をサポートしていますが、前提条件は初めてインターネットで実行することです。
ソフトテストエンジンは、Java環境で運行するWindowsシステムに適用して、複数のコンピュータにインストールすることができます。
PDF版は、Adobe ReaderやOpenOffice、Foxit Reader、Google Docsなどの読書ツールに読むことができます。
あなたのテストエンジンはどのように実行しますか?
あなたのPCにダウンロードしてインストールすると、Linux Foundation CKADテスト問題を練習し、'練習試験'と '仮想試験'2つの異なるオプションを使用してあなたの質問と回答を確認することができます。
仮想試験 - 時間制限付きに試験問題で自分自身をテストします。
練習試験 - 試験問題を1つ1つレビューし、正解をビューします。
あなたはCKAD学習資料の更新をどのぐらいでリリースしていますか?
すべての学習資料は常に更新されますが、固定日付には更新されません。弊社の専門チームは、試験のアップデートに十分の注意を払い、彼らは常にそれに応じて試験内容をアップグレードします。
返金するポリシーはありますか? 失敗した場合、どうすれば返金できますか?
はい。弊社はあなたが我々の練習問題を使用して試験に合格しないと全額返金を保証します。返金プロセスは非常に簡単です:購入日から60日以内に不合格成績書を弊社に送っていいです。弊社は成績書を確認した後で、返金を行います。お金は7日以内に支払い口座に戻ります。
割引はありますか?
我々社は顧客にいくつかの割引を提供します。 特恵には制限はありません。 弊社のサイトで定期的にチェックしてクーポンを入手することができます。
迅速に送付いただき有難うございました。
中身も試験を対応できてとてもよかったです。
無事に試験に合格することができました。
 -Satou
先日試験合格できました。嬉しいです!
JPTestKingさんの問題集は学習しやすい本当に良いです♪
みなさんもこの参考書を使って最小の努力で最大限の結果を得ましょう!!
-折原**
効率の観点からはひたすら模擬試験を解いた方が良いと思います。
正解できなかったところを何度も繰り返し、再度回答しました。
他のテキストは不要です。ご参考になれば幸いです。
-Kikuchi
このCKAD問題集をミッチリ勉強することで、試験に一発で合格できました。しかも高得点で。
よくできた、お奨めの参考書です。
-白川**
はじめ模擬試験できなくても繰り返せば大丈夫です♪知人の勧めとこちらのレビューがいいので、購入でした。正しい選択でした。ありがとうございました。
-Ohshiro
担当者の言った通り、問題集を繰り返し読み込め、すべての内容を暗記しました。そして受験し、合格することができました。実によい参考書でしたが、感謝しております。他の友達も推奨します。
-榎本**
免責事項:当サイトは、掲載されたレビューの内容に関していかなる保証いたしません。本番のテストの変更等により使用の結果は異なる可能性があります。実際に商品を購入する際は商品販売元ページを熟読後、ご自身のご判断でご利用ください。また、掲載されたレビューの内容によって生じた利益損害や、ユーザー同士のトラブル等に対し、いかなる責任も負いません。 予めご了承下さい。
67375+の満足されるお客様

JPTestKingテストエンジンを選ぶ理由
セキュリティ&プライバシー
我々は顧客のプライバシーを尊重する。McAfeeセキュリティサービスを使用して、お客様の個人情報および安心のために最大限のセキュリティを提供します。
365日無料アップデート
購入日から365日無料アップデートをご利用いただけます。365日後、更新版がほしく続けて50%の割引を与えれます。
返金保証
購入後60日以内に、試験に合格しなかった場合は、全額返金します。 そして、無料で他の製品を入手できます。
インスタントダウンロード
お支払い後、弊社のシステムは、1分以内に購入した商品をあなたのメールボックスにお送りします。 2時間以内に届かない場合に、お問い合わせください。


弊社はすべての候補者に高品質の資格問題集を提供します。候補者は始めの試験にパスして、望みたい資格認定を取れるのに役立ちます。お客様は購入前に、資格問題集の無料デモをダウンロードして参考します。
役に立つリンク
Copyright © 2026 JPTESTKING.COM. All rights reserved.